There is a machine in my kitchen that I touch on almost every single plate. It isn’t the stove. It isn’t the fryer. It’s the Salamander. The Salamander is the “Finishing Touch.” It melts the cheese on the French Onion Soup. It caramelizes the sugar on the Creme Brulee. It glazes the ribs. It is a high-intensity overhead broiler.
The Montague Company makes the legendary “Radiglo” broiler, which uses ceramic infrared tiles to reach 1800°F—hot enough to broil a steak in minutes.
This guide explains the difference between a “Cheesemelter” (Weak) and a “Broiler” (Strong), and why you probably need the Broiler.
- That Filet Mignon that needs a perfect crust? Salamander.
- That French Onion Soup that needs the Gruyère bubbled and browned? Salamander.
- That Bruschetta that needs to be hot but not soggy? Salamander.
In this guide, I will explain why this is the most critical tool for presentation, and why you should probably spend the extra money for an Infrared unit.
Deep Dive: How It Works & The “Cheese Melter” Myth
First, let’s clear up a massive misconception. A Salamander is NOT a Cheese Melter.
They look similar. They both cook from the top. But they are different beasts.
1. The Cheese Melter (The “Toy”)
- Power: Low to Medium BTU (20,000 - 30,000).
- Target Temperature: 600°F - 800°F.
- Use Case: Gently melting cheddar on nachos or keeping a plate of pasta warm.
- Chef’s Verdict: If you try to cook raw shrimp in this, it will take 20 minutes and they will be rubbery.
2. The Salamander (The “Weapon”)
- Power: High BTU (40,000 - 50,000+).
- Target Temperature: 1600°F - 1800°F.
- Use Case: Rapid searing, glazing, finishing.
- Chef’s Verdict: This machine is violent. It will turn cheese into black carbon in 45 seconds if you walk away. It is for cooking.
The Technology: Gas vs. Infrared
When you buy a Salamander, you have two choices for the heating engine.
1. Radiant Gas (The “Old Faithful”)
- Mechanism: Gas flames heat up a heavy metal element or ceramic heavy tiles.
- Heat Time: It takes about 15-20 minutes to get fully hot.
- The Workflow: Because it takes so long to heat up, chefs turn it on at 10 AM and leave it running at full blast until 11 PM.
- Pros: Cheap to repair. Indestructible.
- Cons: Wastes a ton of gas. Kicks massive heat into the chef’s face.
2. Infrared Gas (The “Ferrari”)
- Mechanism: Gas is forced through a porous ceramic tile, creating a glowing red surface that emits pure infrared radiation.
- Heat Time: almost Instant (90 seconds to full power).
- The Workflow: You can actually turn it down or off between rushes.
- Pros: Intense, focused heat. It sears better than anything else. 30% gas savings.
- Cons: The ceramic tiles are fragile. If you splash cold water on them while hot, they crack ($300 replacement).
3. Electric Quartz (The “Euro Style”)
- Mechanism: High-powered quartz tube lamps.
- Feature: Instant On/Off. Sensor-activated (turns on when you slide a plate in).
- Pros: Zero ambient heat in the kitchen.
- Cons: Expensive bulbs.
The “Chef’s ROI” Calculator
Owners argue: “Why spend $4,000 on a broiler? The oven gets hot enough.”
Scenario: A Steakhouse finishing 200 filets a night.
| Feature | Standard Convection Oven (500°F) | Infrared Salamander (1600°F) |
|---|---|---|
| Crust Formation Time | 5-8 Minutes | 45 Seconds |
| Meat Temperature Rise | Meat cooks internally while crusting (Gray Band). | Crust forms instantly; internal temp stays Rare. |
| Result | Decent steak. | Steakhouse Quality. |
| Value | - | Customers pay $60 for the crust. |
Verdict: You cannot charge premium prices for “gray” steaks. The Salamander creates the Maillard Reaction (browning) without overcooking the center. It pays for itself in reputation alone.
Installation Guide: Range Mount vs. Wall Mount
You have to put this heavy (200 lb) metal box somewhere.
1. Range Mount (High Shelf)
This is standard. The salamander sits on a reinforced shelf attached to the back of your 6-burner range.
- Pros: Uses “dead space” above the stove. Easy to vent (it’s already under the hood).
- Cons: It makes the “Hot Line” even hotter. The chef is cooking on burners at waist height and has a 1600°F broiler at face height. Hydrate or die.
2. Wall Mount
You bolt it to the wall, usually next to the fryers.
- Pros: Keeps the stove area open. Easier to see into.
- Cons: You need a Heat Shield (stainless back panel) or you will light the wall studs on fire. You also need to make sure the hood covers it (refer to NFPA 96 overhang requirements).
Safety & Maintenance
1. The Grease Trap (Drip Tray)
There is a tray at the bottom that catches dripping fat from steaks and cheese.
- The Danger: If you don’t empty this tray, it fills with liquid fat. The Salamander gets hot. The fat hits flash point. FIRE.
- The Rule: Empty and wash the drip tray every single shift. No exceptions.
2. The Spring Tension System
Most Salamanders have a lever to raise and lower the rack (so you can bring the food closer to the fire).
- The Failure: The heavy duty springs eventually stretch. The rack won’t stay up.
- The Fix: You need to adjust the tension bolt on the side. If that fails, replace the springs ($50).
Troubleshooting Matrix
| Symptom | Probable Cause | Quick Fix |
|---|---|---|
| Burner won’t light | Pilot is out. | Re-light pilot. Check thermocouple. |
| Uneven browning | Clogged burner ports (Radiant) or cracked tile (Infrared). | Use a wire brush (Radiant) or Replace Tile (Infrared). |
| Rack slides down | Weak spring tension. | Tighten tension bolt on side panel. |
| Smell of Gas | Popped Flex Line. | Turn off main valve. Call plumber immediately. |
Top 3 Commercial Salamander Recommendations
Do not buy a cheese melter. Buy a dragon.
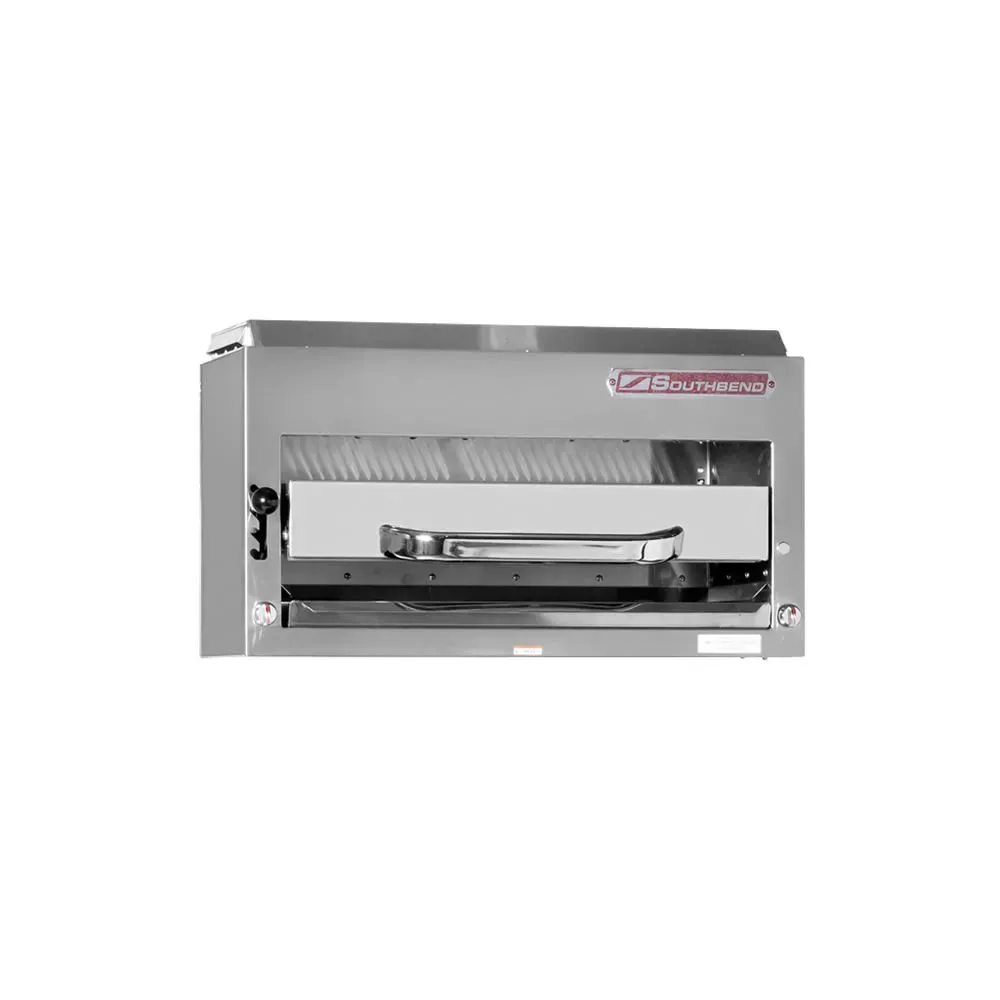
1. Best Overall (The Steakhouse Standard): Southbend Infrared (P36-NFR)
- Best For: High-end steakhouses finishing Filet Mignon.
- Why It Wins: Southbend defined this category. The tile temperature hits 1650°F in 90 seconds. It crumpets a steak faster than anything else.
- Design: The counter-balanced rack system is the smoothest in the industry.
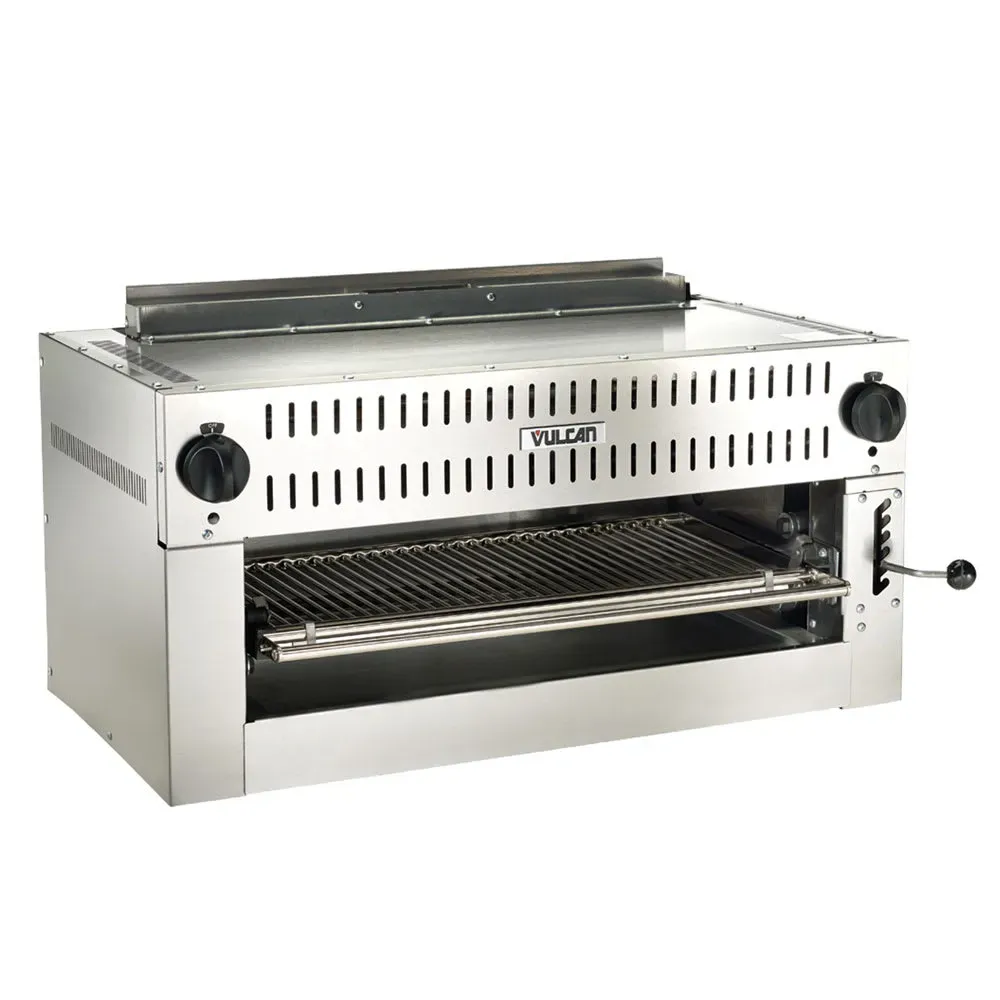
2. Best Versatility (The Dual Zone): Vulcan 36IRB
- Best For: Busy lines with varied menus.
- Why It Wins: It has two independent heating zones. You can have one side blazing hot for searing and the other side off (or lower) to save gas.
- Durability: The stainless steel cradle is reinforced to handle constant abuse.
3. Best Value (Radiant Option): Garland G-Series
- Best For: Casual dining, Pubs.
- Why It Wins: If you don’t want to pay for Infrared (or worry about cracking tiles), this Radiant unit is a tank. It takes longer to heat up, but it will never break.
- Maintenance: The most forgiving unit to clean.
Final Summary
If you charge more than $50 for a steak, you must buy the Southbend Infrared. If you are a pub melting cheese on Nachos, buy the Garland.
Related Articles
Frequently Asked Questions (FAQ)
Q: Can I use a Salamander as a Pizza Oven? A: Technically yes, but practically no. It gets hot enough, but it only heats from the top. Your cheese will burn before the dough is cooked. Use a deck oven for pizza.
Q: How high should I mount it? A: Eye Level. You need to see the food browning instantly. Too high = burns everything. Too low = burns the chef’s face.
Q: Why is my infrared tile cracked? A: You likely splashed water on it while it was red hot. Or you slammed the oven door below it too hard. Ceramic is fragile. Treat it like glass.
Final Culinary Tip: “The Glaze”
Here is a trick I teach my sous chefs. When you are grilling chicken breast, it often looks dry.
- Grill the chicken to 160°F.
- Brush it with a glaze (teriyaki, BBQ, or just seasoned butter).
- Put it in the Salamander on the Highest Setting for 30 seconds.
- The sugar in the glaze bubbles and caramelizes instantly.
- Serve.
That “shiny, sticky, delicious” look? That’s the Salamander. It is the makeup artist of the kitchen.